Nugget Cake
by Libby Fens
Use chocolates to create a layer cake for any occasion.
Supplies
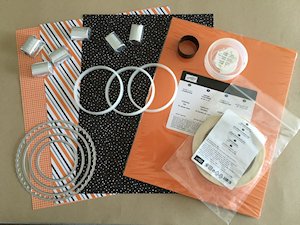
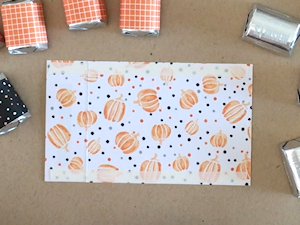
- Patterned paper (Stampin' Up!® Halloween Night Specialty pack used here)
- Coordinating solid color cardstock (Stampin' Up! Pumpkin Pie used here)
- Hershey's Nuggets chocolates
- Double sided adhesive (Stampin' Up! Tear & Tape used here)
- Liquid glue
- Circle dies (Stampin' Up! retired Circles Collection used here)
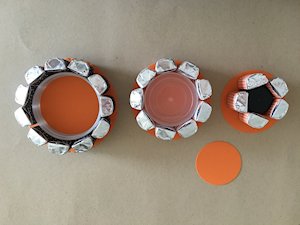
- 3 descending rings about an inch thick (used here: Stampin' Up! plastic container, 3 empty sticky strip rolls, cap from hair mousse cut down)
Step-by-Step
-
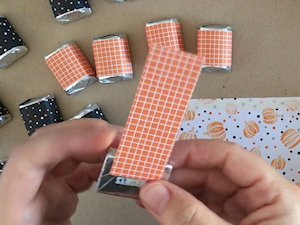
Step 1
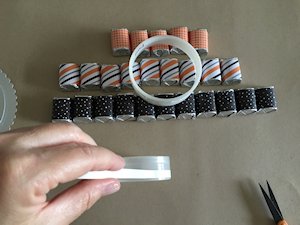
Wrap Nuggets with a 1” x 3” strip of patterned paper and adhere with strong adhesive tape. Wrap opposite the 'flap' on the Nugget, positioning the start end of the wrapper just under the logo on the back. This ensures it will not pull off. Set aside wrapped Nuggets.
-
For the sample, 5 Nuggets were used for the top layer, 9 in the middle, and 11 on the bottom.
HINT:
You can cut a strip of paper 3" by the number of nuggets needed for that layer. If the top layer needs 5 nuggets, cut the paper to 3” x 5”. Apply double sided adhesive across the 5" top and bottom, then cut 1" strips.
-
Step 2
To make the base of the structure, use three leftover tape rolls. Stack and glue or tape them together to create about a 1" thick base.
Find items to fill the structure of the middle and top layers. A medium sized button container and small lid were used in the sample.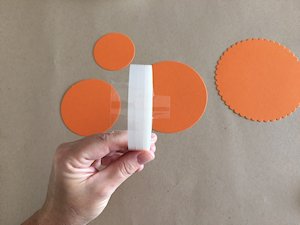
-
Step 3
Apply two rows of strong double-sided adhesive around all three cake bases.
-
Step 4
Working on one cake layer at a time, remove both liners for adhesive. Stand up nuggets all around the base.
NOTE:
You might have to adjust or move the nuggets around to ensure a covered fit.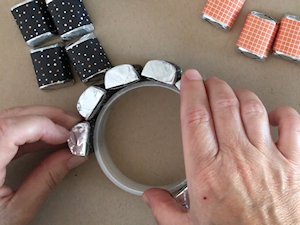
-
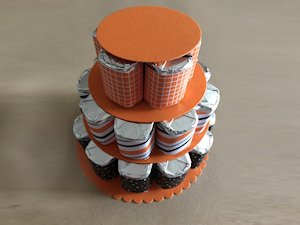
Complete all the layers.
-
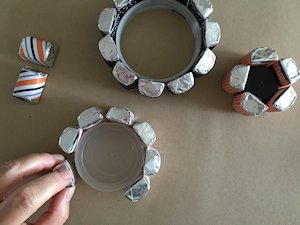
Step 5
Cut four cake layer separators out of cardstock using circle dies.
For the sample, these sizes were used (yours may vary, depending on the forms chosen for the layers):
Base - 5"
Middle Layer - 4 3/8”
Top Layer - 3 1/2"
Cake Top - 2 5/8"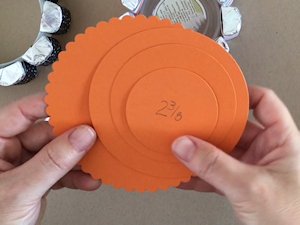
-
Step 6
Stack layers for a test fit. Do not glue until layers look correct. Make adjustments to the sizes of the separating layers as needed.
-
Step 7
Glue layers together separately. Apply glue to the bottom of the nugget ring on each triangle area of the wrapper (this part will be touching the base) and set the ring on top of base. Weight it to assist in firm adhesion.

-
Repeat for each layer. Use a scallop circle base for the bottom layer. The middle layer will be on a circle as well as the top layer.

-
Step 8
When completely dry, glue each layer together by repeating the gluing process with glue on top of the nuggets. Allow the glue to dry completely.
-
Step 9
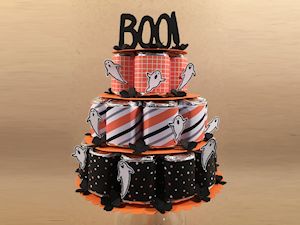
Complete the project, embellishing as you like.
Video!
Your Turn
You've seen the tutorial, now you try it! We've got a section of the gallery set aside for Nugget Cake. Try this technique, then upload your artwork to the gallery. Show us your creations!
***Please note - Internet Explorer/Edge is not a supported browser, and will not allow you to see the videos. Please use Chrome, Firefox or Safari to view our tutorial videos.

Questions and Comments
We'd love to get your feedback or questions. Leave your comment below.
Beautiful
Kim
If you have any questions, please ask.
Libby
I had 'collected' several of theses empty rings over the years and finally found something to do with them!
kim
aka pinkblack
So when I put together my cake, I did end up making my own rings, as I wanted to make it easier for a class. So I thought I would share my dimensions:
1" strips of cardboard in the following lengths: 10", 8", and 6". I also added a 4th layer with 4". I distressed the cardboard to break the fibers slightly before curling. I used a mini stapler to staple the ring closed, 3 or 4 staples is best.
Perfect ring size! I can fit 11 nuggets on the base, 9 on the second layer up, 7 on the 3rd, and if you do a 4th top layer, 5 nuggets. One bag is perfect! (plus 2 left over for a snack. LOL).
Thanks again! This was a lot of fun!
Vielen Dank f�r die tolle Anleitung.
Liebe gr��e von Beate
Page 1 of 1 pages